
Overland encounter tables are probably the single most reusable thing you can make, make it once and just use it over and over forever, and the steady beat of the dungeon encounter roll is the time pressure that penalises overcautious parties.
I mentally divide encounter tables into vague categories - Dungeon, Overland, and City.
So here's some tips.

Dungeon Encounters
This is based on Brendan Necropraxis' Overloaded Encounter Die aka the Hazard System.
I assume you know how to stock a dungeon encounter table - just put whatever you'd find on this dungeon level in the table, plus maybe a homeless wandering beast or two and some scouts from the next level of the dungeon.
Roll the Encounter Die every 10 minute turn. In my game I track this fairly loosely. Down long hallways I might start eyeing up squares and movement rates, but this usually gets rolled any time the party stops to investigate a room, messes around with the scenery, or they Take a Break to eat and heal.
"Are you guys aware that this will take long enough to need an encounter roll?" is something I say whenever somebody wants to spend time poking around a room.
"Are you guys aware that this will take long enough to need an encounter roll?" is something I say whenever somebody wants to spend time poking around a room.
Anyway, the Encounter Die results are as follows:
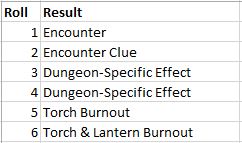
1. Encounter
Your classic encounter. Roll number appearing, make a Reaction roll, roll Surprise if necessary and go.
In a dungeon it's usually quite easy to make up a reason for what they're doing there based on the surroundings and/or the party's recent activity.
In a dungeon it's usually quite easy to make up a reason for what they're doing there based on the surroundings and/or the party's recent activity.
2. Encounter Clue
Roll for an encounter, but give a clue about what's out there instead.
Roll for an encounter, but give a clue about what's out there instead.
Maybe they hear it growling, or voices down the corridor, or see a silhouette in the distance. Corpses are good too, whether it's of the encounter creature or one of its victims.
Basically just make something up that gives an impression of what's out there.
Basically just make something up that gives an impression of what's out there.
3 & 4. Dungeon-Specific Effect
This is the big one. Effects are on a per-dungeon basis and supposed to give some unique character to the locale.
A more dangerous area will have more directly dangerous results, while a safer area might simply be set dressing.
A more dangerous area will have more directly dangerous results, while a safer area might simply be set dressing.
In the Spooky Dungeon, 3 might be "Chill up your spine! Hirelings check morale." and 4 might be "ankle-high fog floods through rooms and corridors, hiding anything on the ground this turn".
In the Earth Elemental Dungeon you could have "Earthquake! Save vs Stun or fall to the ground! Unsecured objects jostle and fall" and "Floor becomes a muddy quagmire, halved movement this turn".
The Tentacle Dungeon had "Distant groaning and shuddering sound, denizens distracted by the great tentacle's sermons this turn" and "Questing tentacle slithers through room, will summon enemies if disturbed".
Basically put a couple of interesting environmental effects in this category. Between these results and the encounters, different dungeons will hopefully feel very different from each other.
5 & 6. Light Source Burnout
Torches have two checkboxes. Lanterns have 4 checkboxes.
On a 5 or 6, tick off a torch checkbox.
On a 6, tick off a lantern checkbox.
Torches have two checkboxes. Lanterns have 4 checkboxes.
On a 5 or 6, tick off a torch checkbox.
On a 6, tick off a lantern checkbox.
This means that, on average, torches last 6 turns (1 hour) and lanterns last 24 turns (4 hours). Just like they're meant to! Plus there's some variance in how long they last. How lovely.

Overland Encounters
You can do a lot of messing about with Overland encounter tables.
The beating heart of my overland encounter tables is this absolutely inspired Procedure for Wandering Monsters by John Bell.
The core innovation is that you have a standard table of encounters paired with a sliding scale of severity. You roll for encounters and also roll a d6 for severity.
If players are up for it, they can keep track of the numbers rolled so they can predict what's out there.
If players are up for it, they can keep track of the numbers rolled so they can predict what's out there.
You end up with something like this:
 |
| Click to Expand - or Drive sheet here |
As you can see, each Encounter also has an entry for Lair, Spoor, Tracks, Traces and Traces/Benign.
This is explained at the link, but I'll reiterate how I do it here for ease of access.
Severity
Encounter: Your classic encounter. You basically stumble right into the situation, or they stumble into you.
Lair: Either an actual lair, or a situation where they're real close. Either way, you might be able to avoid an encounter if you take immediate action.
Spoor: They're real close! Encounter easily avoided, but also easily approached.
Tracks: Evidence that something's been past here recently. You can usually follow the tracks if you want.
Traces: Some evidence pointing to the existence of the encounter in the area.
Traces/Benign: Some more evidence or, if I can't think of anything, some vaguely on-theme set dressing.
Weighting Tables
You likely already know about bell curves, where the average result of two or more dice is most likely to occur. On overland encounter tables I usually use 2dX, so it's weighted towards the middle of the table, and put the most common encounterables there.
The clever thing you can do is vary what you roll on the table to get some variation within the area.
Maybe you don't want the elven forest to be completely homogenous, and want to weight it so there's more magic treant stuff near the centre, and more natural normal stuff near the edges of the forest.
Maybe you want the Dragon to only be found near its lair on the east of the map.
Maybe you've got two factions in the area and you want more of one faction to be around their base in the north, and more of the other around their base in the south.
You don't need to break the area into smaller zones, just vary what you're rolling.
There's two main ways I do this:
Roll Different Dice
Down the bottom left of the encounter sheet image above, you'll see that the dice rolled on this encounter table change based on how dangerous the area is.
This table is for the Contested Farmlands area of my map, where man and necromancer alike are still dealing with the aftermath of Death Frost Doom.
In the safer areas close to cities and on main roads you only roll 2d6, limiting the results to the safer lower end of the table.
As you go deeper into unsafe territory, you roll 2d8 and then 2d10, increasing the scope of possible encounters and making the result more likely to be undead-related.
Roll+X
The other way I weight tables is to just add something to the roll.
On my River encounter table I wanted encounters to shade between the weird creature infested Deep Carbon Observatory aftermath at the top of the river, and the less fucked up area at the river mouth.
On my River encounter table I wanted encounters to shade between the weird creature infested Deep Carbon Observatory aftermath at the top of the river, and the less fucked up area at the river mouth.
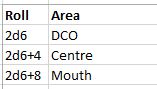
This means that results 2-5 can only be found in the DCO area, and results 17-20 can only be found at the rivermouth. So this is where you put the big rare stuff that's very specific to those areas, like a big ol' age of sail galley at the river mouth, or a big ol' Giant Cuttlefish around DCO.
Everything in between can be found further away from that main starting point.
Remember, the average roll also changes this way, so result 7 will be very common in the DCO area, rare in the Centre and, and not seen at all at the River Mouth.
Everything in between can be found further away from that main starting point.
Remember, the average roll also changes this way, so result 7 will be very common in the DCO area, rare in the Centre and, and not seen at all at the River Mouth.
Using Excel for fun and profit
Excel is fucking great, and you can do a lot of encounter table automation with it.
I'll go into the wacky world of automated subtables in the City Encounters section, but for now allow me to tell you a really simple trick.
You'll want to grab a copy of this sheet.
The main trick is RANDBETWEEN, aka the Excel diceroller.
=RANDBETWEEN(1,6) will roll 1d6.
=RANDBETWEEN(1,10)+RANDBETWEEN(1,10) will roll 2d10.
The other trick is that you can chain text into a formula with & and quotation marks.
="Ghouls ("&RANDBETWEEN(1,12)&") led by a Ghast" will give you Ghouls (1-12) led by a Ghast.
Thus endeth the lesson.

City Encounters
The trouble with towns and cities is that I want to make the district/borough/area unique, but also allow each district to be part of a cohesive whole.
So unlike, say, having a different encounter table for the Forest and the Mountains, or rolling different dice in different areas of the Forest, I want one that has a fair amount of overlap while also giving each area its own flavour.
First you want to split the city into zones. In Moondin, a town that was in the middle of riots, I had a central Anarchy Zone and several other zones under the control of various factions.
My campaign map's capital, Fortress-City Fate, has 12 main districts arrayed like the face of a sundial. Each district is defined by the sort of businesses or housing that the area is known for.
Rather than have a separate encounter table per district (too much effort), we're going to have table entries we swap out per district. The other results will be permanent fixtures or subtables that remain the same no matter where you go.
Here's the encounter table for Fortress-City Fate. It's the most complex one I have since it's the most important city in the country, and players can get embroiled there quite easily.
Man that's a lot of subtables and lookups!
It's all automated on the actual sheet, but this calls out what each thing means.
Cells highlighted in yellow point to subtables for things you'll see or experience in any district of the city.
Cells highlighted in blue are swapped out depending on the district.
The encounter roll at the bottom is the equivalent of the overland severity roll, just more loosely defined and city-related.
Clash between two encounters (result 3) isn't necessarily a fight, just one result affecting another.
District Differences
The blue-highlighted per-district results are the most important part.
My hope is that players who get lost, or find themselves popping out of a manhole somewhere after a deep dive into the undercity, might be able to work out where they are based on these.
For instance, Result 7 is "Common Local Encounter", which is the population you'll see most often in an area. It pulls from the following table:
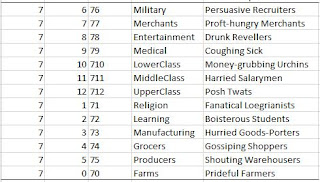
So in the Lower Class district you'll often see money-grubbing urchins, while in the Learning district you'll come across lots of boisterous students.
Bear in mind that if the players look around they'll probably see these types of people, rolling them as an Encounter just means they're directly notable.
City Subtables
The yellow-highlighted cells are subtables for things that can happen anywhere in the city. This could be because it's a more generic result (like thieves), something that could happen anywhere (like a cart crash) or something that affects the entire city (like a rainstorm).
As an example, here's the City-Wide Event subtable:
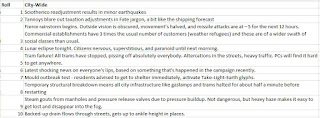
This stuff could happen anywhere. You may notice that some results are from Vornheim, steal from it liberally!
Excel Again
You can automate this whole process with Excel. Rather than flipping between tabs or physical pages to use subtables, you can just pull everything into the one front page.
As an example of the final result, check these out.
If you already know the wonders of VLOOKUP (or its mighty brother, Index Match) then you have finished the blog post! Congrats!
For those who don't, you were going to have to learn one day.
First, make a table. Numbered first column, results in second column. Standard D&D stuff.
Second, set up your auto-roller with VLOOKUP. To our D&D-trained eye, the formula looks like this:
=VLOOKUP(Die Roll,Random Table Location,Column,FALSE)
Replace Die Roll with our good friend RANDBETWEEN. As in the Overland Encounters section, this is the Excel dice roller.
RANDBETWEEN(1,6) will roll 1d6.
RANDBETWEEN(1,10)+RANDBETWEEN(1,10) will roll 2d10.
Adjust to however many "dice" you want to roll on the table.
Replace Random Table Location with the coordinates of your table.
If your table is between Cell A1 and Cell B10, this will be A1:B10.
Usually you just click and drag over the area.
Replace Column with 2 for a simple two-column table. This means that we'll get the result from the second column, ie. the results.
Keep FALSE as is. It needs to be there for some reason.
And voila! Your very own hands free in-Excel dice roller and results-giver.
Top tip: you can press F9 to reroll.
That's all folks
There's a bit of extra Excel bodgery going on in the Fate encounter table, but it's mostly based on VLOOKUPs. Feel free to poke around! If you need a hand, send me a message.
So unlike, say, having a different encounter table for the Forest and the Mountains, or rolling different dice in different areas of the Forest, I want one that has a fair amount of overlap while also giving each area its own flavour.
First you want to split the city into zones. In Moondin, a town that was in the middle of riots, I had a central Anarchy Zone and several other zones under the control of various factions.
My campaign map's capital, Fortress-City Fate, has 12 main districts arrayed like the face of a sundial. Each district is defined by the sort of businesses or housing that the area is known for.
Rather than have a separate encounter table per district (too much effort), we're going to have table entries we swap out per district. The other results will be permanent fixtures or subtables that remain the same no matter where you go.
Here's the encounter table for Fortress-City Fate. It's the most complex one I have since it's the most important city in the country, and players can get embroiled there quite easily.
 |
| Drive link here if you want to check it out, you'll have to save your own copy though! |
Man that's a lot of subtables and lookups!
It's all automated on the actual sheet, but this calls out what each thing means.
Cells highlighted in yellow point to subtables for things you'll see or experience in any district of the city.
Cells highlighted in blue are swapped out depending on the district.
The encounter roll at the bottom is the equivalent of the overland severity roll, just more loosely defined and city-related.
Clash between two encounters (result 3) isn't necessarily a fight, just one result affecting another.
District Differences
The blue-highlighted per-district results are the most important part.
My hope is that players who get lost, or find themselves popping out of a manhole somewhere after a deep dive into the undercity, might be able to work out where they are based on these.
For instance, Result 7 is "Common Local Encounter", which is the population you'll see most often in an area. It pulls from the following table:

So in the Lower Class district you'll often see money-grubbing urchins, while in the Learning district you'll come across lots of boisterous students.
Bear in mind that if the players look around they'll probably see these types of people, rolling them as an Encounter just means they're directly notable.
City Subtables
The yellow-highlighted cells are subtables for things that can happen anywhere in the city. This could be because it's a more generic result (like thieves), something that could happen anywhere (like a cart crash) or something that affects the entire city (like a rainstorm).
As an example, here's the City-Wide Event subtable:

This stuff could happen anywhere. You may notice that some results are from Vornheim, steal from it liberally!
Excel Again
You can automate this whole process with Excel. Rather than flipping between tabs or physical pages to use subtables, you can just pull everything into the one front page.
As an example of the final result, check these out.
 |
| Entertainment area |
 |
| Middle Class area |
If you already know the wonders of VLOOKUP (or its mighty brother, Index Match) then you have finished the blog post! Congrats!
For those who don't, you were going to have to learn one day.
First, make a table. Numbered first column, results in second column. Standard D&D stuff.
Second, set up your auto-roller with VLOOKUP. To our D&D-trained eye, the formula looks like this:
=VLOOKUP(Die Roll,Random Table Location,Column,FALSE)
Replace Die Roll with our good friend RANDBETWEEN. As in the Overland Encounters section, this is the Excel dice roller.
RANDBETWEEN(1,6) will roll 1d6.
RANDBETWEEN(1,10)+RANDBETWEEN(1,10) will roll 2d10.
Adjust to however many "dice" you want to roll on the table.
Replace Random Table Location with the coordinates of your table.
If your table is between Cell A1 and Cell B10, this will be A1:B10.
Usually you just click and drag over the area.
Replace Column with 2 for a simple two-column table. This means that we'll get the result from the second column, ie. the results.
Keep FALSE as is. It needs to be there for some reason.
And voila! Your very own hands free in-Excel dice roller and results-giver.
Top tip: you can press F9 to reroll.
That's all folks
There's a bit of extra Excel bodgery going on in the Fate encounter table, but it's mostly based on VLOOKUPs. Feel free to poke around! If you need a hand, send me a message.
With the variable light source burnout rule, we now have a mechanic for the Miracle of Hanukkah!
ReplyDeleteThey must have rolled many encounters to avoid burning their lamp oil!
DeleteMatch Index is the way ;)
ReplyDeleteAlways! And yet I always default to vlookup because the formula is slightly easier.
DeleteI am only a level 3 excel wizard.